Monday, March 25, 2013

Calming the Product Junkie Part 1: How to Find the Best Hair Products for Your Curly Hair and Save Money!

I think that we all have a tendency to succomb to the "next best thing" in hair care.  Sometimes, you just have to try that new shampoo/conditioner/leave-in/gel/mousse/pomade/goo because you just never know when that product you try is going to be something that is your holy grail hair product, the one thing that transforms your hair to the exact result you want every time.  On naturallycurly.com, this condition is known as "product junkie" syndrome.

Well, curlies, I'm here to be your loving reality check.  I want to give you some clear, concise tips that will help you resist the urge to buy every new product you read a positive review for.  My hope is that once you read this guide, you will have a way to target your search for hair products so that you're finding what will actually work for you, not just what worked for a stranger on the internet.  My plan is to have a multi-part series so that the info is manageable.

Step 1: Get to know your curls at more than a superficial level
The hair typing system that ranks curls by tightness is of really limited use, but "What is my hair type?!" is one of the most often asked questions on the CurlTalk forums.  This is endlessly frustrating because knowing what your curl tightness is tells you next to nothing about what products will work for your hair.  So, my first piece of advice is to ignore the hair typing system and look deeper.

I will explain to you below how to figure out your hair properties.  However, a curly hair stylist who frequents naturallycurly.com has actually created an online "hair analysis" for those who want a professional to tell them their hair properties.  For a small fee, you will send in a hair sample, and Tiffany will email you in 3-4 weeks and tell you lots of things about your hair type, including brand-neutral advice on what to look for in hair products.  I don't have any association with this analysis offering other than having read a lot of really positive things about it on naturallycurly.com, but I felt I would be remiss not to mention it here.

Hair Properties That Matter
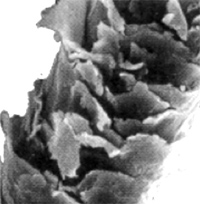
1) Porosity.  This property of your hair will tell you so much more about what products will work for you then curl tightness typing will.  Porosity, to put it simply, is how many holes are there in each strand of hair?  Sounds silly, I know.  Hair can be low porosity, normal porosity, or high porosity.  But your hair is made up keratin shingles (called the cuticle) that lay over a cortex.  If the "shingles" of the cuticle lie very flat against the cortex and prevent ingredients from reaching the cortex, that hair strand has low porosity. If the shingles are blown out far from the cortex and ingredients pass through like a sports car on the Autobahn, that hair strand is of high porosity.  Normal porosity is in between.  The pictures below show what I've just described.

Low porosity.  Notice how nothing is getting through
to the core of that hair strand without a fight!
Very high porosity. This cuticle is damaged.
Normal porosity.  Notice how there is definitely some room for
ingredients to reach the center cortex, but the shingles
lie flat on each other.
Hair has its own natural porosity, but we can alter it by doing things to our hair.  For instance, bleaching creates holes in the cuticle, making bleached or frequently color processed hair very likely to be high porosity.

Check your porosity by taking a strand of hair and sliding your thumb and forefinger up the length of the strand (from tip to scalp).  Do your fingers glide along super quickly and easily, maybe even making a squeaking sound? That hair strand is of low porosity. Low porosity hair is resistant to chemical services like coloring, so if you've noticed that your hair doesn't "take" color well, that might be another clue for you.  If your fingers "catch" on their journey, you've got high porosity hair.  Normal porosity lies in between these two extremes.  Most will hair normal porosity hair.

2) Texture.  You probably already have a working familiarity with this property.  We divide hair into three categories of texture: fine, medium, and coarse.  Texture is the diameter of each individual strand of hair on your head.  I find the descriptions at livecurlylivefree.com to be particularly helpful.  They are quoted below:
    "Does the hair strand look delicate, a bit insubstantial, somewhat translucent, and seem almost as if it's "barely there"? If any of these characteristics fit, the hair texture is most likely fine.
     Does the hair strand look thick, wiry, and sturdy? Does it seem substantial and strong, with a very definitive presence and a distinctive lack of suppleness? If so, the hair texture is most likely coarse.
     Does the hair strand seem somewhat solid, but not overly thick? Does it have some substance to it, but is still fairly supple? If so, the hair texture is most likely medium.
     Please remember it is quite possible to have hair of varying textures all over your head―texture isn't always a "one size fits all" kind of hair property!"

How Can You Use This Information To Target Hair Product Buying?
First of all, it will help you read reviews more intelligently.  If you read a review from me (low porosity,  fine texture), but you have high porosity and coarse hair, that's a red flag that this product isn't going to work the same on you as it did on me.

Second of all READ INGREDIENT LABELS!  I know they look like mumbo jumbo to you right now, but it gets easier.  Here are some guidelines for what kinds of ingredients to look for your hair types.

Low porosity hair needs help getting products to truly penetrate the hair.  Avoid oils that seal the hair cuticle, since your whole issue is that ingredients can't reach the core of your hair strands.  These oils include almond, grapeseed, avocado, flaxseed, and sunflower oils.  Oils that moisturize are OK though, especially coconut oil, which can get inside the hair cuticle. Your hair is probably dry because moisture has a hard time getting inside the cuticle.  When you do a moisturizing deep treatment, use heat, because that will lift up your "shingles" and allow more penetration.  Avoid products with low pH  as they will further seal the cuticle.  Your hair can handle things like baking soda washes.  Some will say that you should avoid protein treatments, as the whole point of the protein treatment is to fill holes in the cuticle.  I personally disagree, because I have fine hair, and my fine (but low porosity) hair loves every protein I can throw at it.  Try to achieve a balance of moisture and protein, erring on the side of moisture.

High porosity needs help filling the holes in the cuticles, which will ultimately help the hair retain moisture and beneficial ingredients.  Sealing oils (see paragraph above) are your friend, as are protein treatments (unless your hair is also coarse; see below).  Your hair can also handle very rich emollients like shea butter.  Use an apple cider vinegar rinse to help close your cuticle once every week or every couple of weeks.  Products that have low pH are your friend.

Normal porosity hair needs balance.  You need to try to balance moisture and protein.  Look for conditioners that contain ingredients like keratin or collagen (or anything called an "amino acid").  Rotate that conditioner with one that has moisturizing ingredients like oils or emollients.

Fine hair needs help not being weighed down, and it needs protein.  Fine hair loves protein.  Use frequent (1x week) protein treatments.  Be careful with using oils in conditioners and styling products because they may weigh you down.  Look for products that are more like milks than creams.  You want products that are water-based (look for water high on the ingredients list).

Coarse hair needs moisture.  Coarse hair loves humectants and emollients.  Look for ingredients like fatty alcohols (cetearyl alcohol, for instance), glycerin, and shea butter.  Avoid protein (appears in ingredients lists as keratin, silk amino acids, collagen, wheat and soy based ingredients, hydrolyzed ingredients).  Protein often makes coarse hair feel like straw.

Medium hair needs balance.  You have pretty much free reign over ingredients.  You'll have to do a bit more guesswork when it comes to figuring out what your hair likes and doesn't like.


Once you know your hair on more than a superficial level, you can start to read ingredient labels intelligently and scrutinize product reviews so that you can know if a product is likely to work for you!

Check out Calming the Product Junkie Part 2!

Thursday, March 21, 2013

How To Apply Products to Curly Hair

Sometimes how you're applying products can make just as big of a difference in how your hair ultimately looks as what you're applying.  I'm going to give you a rundown of the most tried and true rules for applying product to your hair.

1) Apply to soaking wet hair
This is probably the most often repeated advice for curly hair.  I can virtually guarantee you've heard it before.  I would say that for about 90% of curlies, this advice works very well.

Frizz: obviously, the main reason we do anything to our hair as curlies is to cut down on frizz!  Most find that applying products to soaking wet hair greatly decreases the amount of frizz they see when their hair is dry.

Product distribution: water helps move product throughout your hair.  If you've ever tried applying a gel or mousse to damp hair, I am willing to bet that you've found that your finished result looked or felt like you "missed a spot."  Applying to soaking wet hair virtually eliminates this issue.

Clumping: bad for your mascara, good for your hair!  Clumping is the word used to described larger, fuller curls as opposed to skinnier curls.  Applying product to soaking wet hair generally encourages the formation of curl "clumps," which gives you a fuller curl look.

I apply my hair products in the shower, as I have a running source of water to make sure my hair is always sopping wet.  But, you can also do this at your sink if that doesn't appeal to you for whatever reason!

2) Rake in leave-ins or curl creams, but scrunch in products that have hold.

The goal with applying a leave in is to get it all over your hair (or, if you avoid applying products to your scalp, to get it all over your length).  Raking in the product with your fingers is a good way to accomplish that mission.  In order to stay consistent with my apply to soaking wet hair rule, I actually keep my leave in conditioners in my shower.  I also keep my trusty Denman brush in the shower with me.  That way, I can apply my leave in my raking it through my hair, then I comb it through and part my hair.  After I part my hair, I very very quickly stick the length of my hair under the shower again to get it completely soaking wet for the next step.

Scrunching in products with hold encourages even curl formation.  What's a product with hold? Think gels, mousses, and jellies.  They are the products that leave you with more defined hair, and often they leave you with a bit of a crunch to your hair when dry.  They create a cast over your hair shape, holding it in place while it dries.

I always scrunch in a product with hold.  So, while still in the shower (mostly to avoid making a mess on my bathroom floor with my sopping wet hair), I take my Suave Professionals Captivating Curls Mousse and scrunch it in to my hair.  I spread the product over both of my hands, leave to one side, and using a cupping motion, I squeeze the product into my hair.  You'll be able to hear a "squish" sound when you're doing this.  I then get a little more product on my hands, lean to the other side, and repeat.  If I feel like I need it, I lean back a bit, and hit just the back of my hair with a final small dose of product.

For my hair type, the mousse alone often provides enough hold.  If it's particularly dry or humid outside that day (low dew point or high dew point), I will add a gel on top.  I simply repeat this same scrunching  technique using the gel.

3) It's tempting. But don't touch while drying!
Your product with hold needs to just sit and hold your hair in place!  Aside from squeezing out water with my Curls Like Us towel, I don't touch my hair while it dries.  I wait until 100% dry, then if I have any crunch from my products, I use that same cupping/scrunching motion on my hair with dry hands to scrunch out the crunch.  This leaves me with nice, soft hair.  If you can't scrunch out the crunch this way, you used too much of your holding product.


Tuesday, March 12, 2013

Water Quality and Your Hair

The quality of the water coming into your home or apartment can make a huge difference in your skin and hair. I recently was reminded of this fact when I came home from school for spring break. The area where I go to school has very hard water, but the water at home is soft. My hair is like night and day even using the same products and the same techniques in terms of how it looks and feels.

What is the different between hard water and soft water?
Hard water contains more minerals than soft water. To be more technical, hard water has more cations in it, generally Mg2+ and Ca2+. The minerals get into the water by leaching in from the ground, so they aren't "unnatural" or anything. Hard water poses no health risks, but it can be hard on industrial components and pipes.

How can I tell what kind of water I have?
The general wisdom is that if you have hard water, when you use soap or shampoo, you don't get as much sudsing action. You will also get soap scum buildup.  Generally, people who have lived with hard water for most of their lives find the feel of soft water to be "slimy" or "slippery" in comparison.

I think the easiest and most reliable way to test whether you have hard or soft water is to actually test it! Get your science on!

Here's one cheap tester available online. It's digital, so you just stick it in to your water and let it do its thing.

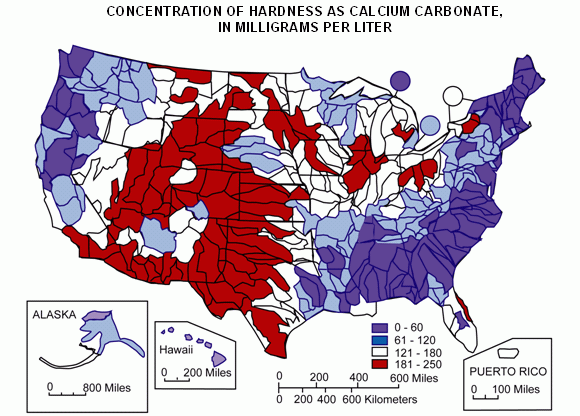
If you don't want to test the water, you can guesstimate by using a water hardness map. Your local water supply might provide this info (usually upon request) but the USGS provides a national map as well.


How does hard water affect my hair?
Hard water residue feels a lot like silicone build up, if you're familiar with that.  Your hair feels limp and lank.  Your curls don't bounce up and they look dull.  You feel like there is also something on your hair, even when you go product free, that makes it feel gunky.

I've got hard water and I'm never happy with my hair.  What are my options?
First, I would recommend trying a clarifying shampoo once a month that is made for hard water.  The two best options for that are Malibu C Hard Water Shampoo, which is pricey but extremely well reviewed, and Ion Hard Water Shampoo, from Sally Beauty Supply, which is cheap and has good reviews.  I have used the Ion Shampoo with success, but have not tried the Malibu C before.

Second, if you've tried those and had the aha! moment that hard water might be causing your issues, I would look into a more permanent solution, like a shower water filter.  Most shower filters take out chlorine, which has nothing to do with water hardness, so you need to find one that specifically will soften water.  Here's one that looks like it would do the trick but I have not personally tried it.    

I've got soft water and I'm never happy with my hair. What are my options?
I'm going to guess your issues are poofy hair that is always fuzzy and undefined.  Since soft water does not have as much of a stripping effect on hair as hard water, you are probably over conditioned or lacking protein.  I would recommend a protein treatment to bring some definition and life back to your hair.  There are tons of options for protein treatments.  Here's a great at home treatment that is loved by many.  As far as store bought treatments go, I have used and love Nexxus Emergencee (this is an intense protein treatment that is best if used monthly), Aphogee Two Minute (this is more of a weekly treatment), and the Spiral Solutions Repairing Protein Treatment (lies somewhere in between; I would use this biweekly).

Thursday, March 7, 2013

Life as a Product Junkie: How to Save Money on Hair and Beauty Products


Life as a curly girl who loves her beauty products can get expensive.  About a year and a half ago, I signed up with mint.com because Mint allows you to see exactly what your money is going to every month.

Well, that was an eye opener! The first month, I would say about a third of my money was spent on random hair and makeup purchases.  So I determined to cut back.  I discovered that there are so many different ways to reduce your spending on cosmetics and hair products without having to quit cold turkey.

Shopping Smarter
I used to wander into a Walgreens or Target, pick something up, and buy it.  Those little here and there purchases seem innocent enough, but they add up so quickly!

The first thing I did was start to check prices for things I know I love online.  For instance, I've used Aveeno Daily Moisturizing Body Wash for years.  According to walmart.com, the going price for a bottle is $4.97.  Well that's not that expensive, right?  But if I buy it on Amazon, I can get a two pack for $7.83, and I get free shipping if my order is over $25.  So that means I buy 4 two-packs at a time.  That comes out to $31.32 for 8 bottles.  At Walmart, to buy 8 bottles would cost me $39.76.  Plus I would have to actually go to Walmart and buy it, costing me gas money and time.  Eight bottles easily lasts me a year.  So I'm set on body wash and don't have to worry about it until next year.

The lesson here? Comparison shop online and buy in bulk when you can with items that you know you love.

If you haven't tried an item yet, don't buy a full size! Sample a product at places like Sephora and Ulta before committing.  Read reviews, but don't read them blindly.  It's important to find someone who has a similar hair type for hair products, or a similar skin type/tone for makeup products.  If I tell you a product is great for my dry skin, but you have really oily skin, don't just rely on my review! Find another reviewer with oily skin on a place like makeupalley.com before you buy!

Get Paid to Shop Online

One word: Ebates!  Ebates.com is a site that gives you a refund on your online purchases.  The refund percentage usually ranges from 3-6%, but they have double refund days and promotions like that frequently.

All you have to do to start saving online is sign up (it's free), and when you are ready to shop online, head to Ebates and see if the site you're using is listed.  They have all the reputable online stores that could ask for.  It's really rare that a site I want to buy from isn't on Ebates. Then just click on the Ebates link to go to the store.  Make your purchase, then Ebates will email you a few days after your items have shipped letting you know that they've verified that you made a purchase.  Ebates will send you a check for your refund amount each pay period (pay periods are a couple months in length).

I know it seems to good to be true, but it isn't! I have received refund checks and deposited them without issue. The hardest part about Ebates is remembering to go to the site before you purchase.  So I put a link in my browser memory bar so that hopefully I see it.  There's literally no reason not to use Ebates when you shop online.

Click here to sign up for Ebates

Take Advantage of Discount Stores
I am a proud TJMaxx and Marshall's and Ross addict.  Each of these stores has a hair and beauty section, and you are missing out if you aren't taking advantage.

For example, I love Joico hair products. They cost around $16-20 a bottle from places like Ulta.  Yikes!    But I can usually find a larger size at one of these stores for half the price.  My stores usually also carry brands like Giovanni (a curly girl friendly line), Tigi, and Alba.  In the makeup and beauty department, my TJMaxx almost always has some Essie nailpolishes (retail $8) for $3.99.  And I often see eyeshadow kits and makeup gift sets on sale too.  I make it a point to check these areas every time I go.

Never Pay Full Price
There are too many ways to avoid paying full price for hair and beauty items to ever allow yourself to pay.

1) If buying online, check for coupon codes.  Retailmenot.com is my personal favorite
2) Check manufacturer Facebook pages and Twitters.  They often run giveaways and give out coupons to followers.  For instance, this week L'oreal's facebook page is giving away 10,000 boxes of hair color a day.  Your odds of winning are pretty darn good!  Also this
3) Contact the manufacturers! I can't tell you how many times I've gotten a free sample or a coupon for a free product by asking for one.  Companies want you to become loyal buyers.  If you contact their customer service about trying a product, they are usually more than happy to help you out.
4) Use online coupon sites.  Sites like coupons.com and flamingoworld.com offer printable coupons for your drugstore trips.
5) Sign up for manufacturer emails. This one is self explanatory, but perhaps a little annoying. But if you use Gmail, you can set up a mail filter to have all your "junk mail" get marked as read and moved out of your inbox. That way you can easily go find a coupon when you need one, and it's super easy to delete the junk mail all at once since it's in its own folder.

For True Online Power Shoppers
If you aren't a member of Amazon Prime, I've got only one question: Why not?!?!

For $79 per year (or only $39/year if you have a .edu address), you get free two day shipping and $3.99 one day shipping on any order.  I love Amazon because they are reliable, they have the best darn customer service out there, and they are usually cheaper than any other online place.  Prime also gives you access to streaming movies and TV shows, which is awesome.  Also, one secret that they aren't so open about is that you can share your membership with up to 4 people in the same household, or up to 4 coworkers.  I cannot recommend getting Prime enough if you are an avid online shopper.

What are your favorite ways to save money on hair and beauty products?  Leave a comment below!

Monday, March 4, 2013

Review: L'Oreal EverCurl Hydracharge Shampoo and Conditioner

Hair product companies have begun to ride the sulfate free wave in recent years, and L'Oreal has been one of the companies at the forefront.  It started with their EverPure line, and now this year they've released a similar line that is supposed to be for people with wavy and curly hair.

Here are the products in the EverCurl line along with their official descriptions taken from the L'Oreal website, with some added thoughts on each in brackets:
  • Hydracharge ShampooEverCurl Hydracharge Shampoo quenches and softens perfecting each curl’s shape. Infuses hydrating nourishment without weigh-down. Curls are softer, more manageable without frizz. Its rich lather and natural aromatic properties help invigorate the senses. 100% Sulfate-Free, No Harsh Salts, No Parabens, 100% Vegan [this product is not silicone free]
  • Hydracharge Cleansing Conditioner: EverCurl Hydracharge Cleansing Conditioner is an innovative, gentle way to cleanse and condition curls in one simple step.  Our formula helps preserve each curls’ natural moisture.  Low-lathering crème cleanses and helps reduce friction to keep curls smooth, soft and manageable.
  Ultra conditioning formula is infused with hydrating botanicals. 100% Sulfate-Free, No Harsh Salts, No Parabens, 100% Vegan, No Heavy Waxes [I will also add that this product is silicone free, making it a conditioner wash option for those following the Curly Girl method!]
  • Hydracharge Conditioner: EverCurl Hydracharge Conditioner quenches and nourishes perfecting each curl’s shape. Infuses hydrating nourishment without weigh-down. Curls are softer, more manageable without unwanted frizz. Natural aromatic properties help invigorate the senses. 100% Sulfate-Free, No Harsh Salts, No Parabens, 100% Vegan [this one is also silicone free]
  • Hydracharge Leave In Cream: EverCurl Hydracharge
 Leave-In Cream provides intense 
hydrating nourishment with no weigh down. This ultra-rich formula feeds curls with moisture, helps
block frizz and nurtures each curl’s elasticity and shape. 100% Sulfate-Free, Non-Drying, 100% Vegan [not silicone free]
  • Sculpt and Hold Gel: EverCurl Sculpt & Hold Cream-Gel combines the care of a rich hydrating cream that conditions + a styling gel that shapes without weigh down. Curls remain smooth and hydrated. 100% Sulfate-Free [not silicone free]
  • Silk and Gloss Dual Oil Care: EverCurl Silk and Gloss Dual Oil Care is a dual-phase formula that helps detangle and separate curls while adding shine. This weightless 2-in-1 oil infuses silky moisture without greasiness. Curls are soft, more manageable without stiffness or frizz.  100% Sulfate-Free, Botanical Oils [not silicone free. This product has the most silicone, which isn't surprising given that it wants to add shine.]
So as you can see, even if you're following the strict no sulfate, no silicone Curly Girl method, there are two products in this line that you can try out! And for those following a sulfate free routine while using silicones (like me!) this whole line is your playground.

Alright, so let's get to it.  I picked up the shampoo and conditioner (not the cleansing conditioner, the "regular" conditioner) from my grocery store.

EverCurl Hydracharge Shampoo


I was really worried after picking up these products that they would be too strongly fragranced.  I have used stuff from the EverPure and EverCreme lines, and I hated the scents.  They were so strong and so fake, they made me sneeze!  So it was a huge relief when I jumped in the car outside of the store, popped open the top of the shampoo, and my nose was greeted with a pleasant marine scent.  It's definitely scented, but it's not as heavy as in the other lines.  I also think it's a much nicer smell in general.  I find that it does not linger strongly on my hair to the point that I smell it all day, but if I grab a handful of hair and smell it directly, I can detect it.

The product itself is creamy white.  It passes the "if I hold my hand upside down, does it fall out of my hand" test, so I would call it a thicker product, but it isn't a cream consistency.  To me, it looks and feels like a thickened up regular shampoo, as opposed to a cream.  

For being a sulfate free shampoo, this stuff lathers wonderfully.  I would say it's got the most lather of any sulfate free shampoo I've personally used.  You can really work up a very spa-like washing experience.  I know a common complaint of those switching from sulfates to sulfate-free shampoos is the lack of lather (though keep in mind the lather isn't really what cleans!), but you won't feel like you're missing out with this product.

After rinsing this out, my hair feels clean without feeling stripped, which is fantastic.  It leaves my hair feeling moisturized, but not so moisturized that I feel like I could skip conditioner.  It's just a nice, non-stripped feeling.

I do think that using this shampoo cut down on frizz.  I have now tried it many times with conditioners that I have been using for a long time, and I find that compared to my usual shampoos, this one leaves me with a smoother finished result.

Bottom Line
I love this shampoo!  I think it cleans without stripping, the scent is pleasant but not overpowering, and it gives a really nice lather when you work it into your hair.  I will absolutely keep using this and will repurchase.  Check it out here!

EverCurl Hydracharge Conditioner


Again, as with the shampoo, I was concerned that the smell would give me fits.  But, like the shampoo, the scent is there, but not overpowering.  It definitely seems like L'Oreal listened to complaints about the other lines when making the formulations for these products.

This conditioner is a thick white cream.  It comes out of the bottle in a really silly little stream.   If you have a lot of hair, I could see it taking a while to get enough product out for your use.

The first time I used this conditioner, I thought it was more or less a disaster.  When it dried, my hair was way too soft.  It had lost nearly all of it's curl holding ability, which is obviously not what you want in a curly hair care product. 

I tweeted about how confused I was by this result, and the L'Oreal twitter replied to me!  As a side note, I like that a lot of big companies are watching for references to their products on Twitter and reaching out to customers.  Really smart customer service. Whoever was tweeting to me recommended that I use less product.  Now, every curly girl knows that you need a lot of conditioner to make your curls happy.  So I won't lie, I laughed and thought, "Yeah right..."

But, for the purposes of a thorough review for you guys, I took the chance.  I used less than a quarter sized amount (my normal conditioner amount is probably two to three quarters depending on the product).  

Well dang. They were right.  You need to use way less of this conditioner than your instincts tell you too.  After using less, my hair got its hold and bounce factor back.  


The slip of this conditioner is not amazing.  It has a bit of resistance when you try to take it through your hair.  After having figured out the amount of product to use, this is my only lingering complaint.  

Bottom Line
I like this, but don't love it.  I wish it had better slip, and there is a bit of a learning curve with respect to how much of it you need to use.  I don't find that this weighs me down.  It will stay in my conditioner rotation, but the jury is still out for whether I would repurchase.  Probably if it's on sale.  I think someone with more coarse hair or thicker hair than mine might enjoy this more.  Check it out here!

Final Thoughts
I will definitely be trying more in this line.  I think it's pretty decent thus far.  What would you guys like to see reviews for?? Let me know in the comments!

Tuesday, February 26, 2013

Review: Flower Cosmetics Lighten Up Brightening Concealer

So you guys know that so far I've tried the Flower Beauty blusher/bronzer duo, two Flower nail polishes, and two of the Flower lip butters and have been pretty happy with all of them.

Well...I hate to break a streak, but I have been trying out the Flower Cosmetics Lighten Up Brightening  Concealer over the past few days, and I'm sorry to say that this one isn't a favorite.

What I look for: In a concealer, I'm looking for pigmentation, blendability, and effectiveness.  I have some pretty blue under eye circles, and I need those to get covered easily and effectively.  I also have some redness around my nose that I conceal daily.

Packaging: This concealer has the twist-up into a brush style packaging.  The brush bristles are long and flexible.  I hate applying concealer with a brush like that (I prefer using a Sigma P80 or P86 brush) so I just use the applicator to get the product onto my skin and work from there.


Color Selection: 4 colors. That's it.  To fit all the range of skin tones that need concealer.  Yeah.  The shade I'm using is BC2, which is the second lightest shade.

Application:  I did not find this to be especially smooth with application.  Check out these swatches.  In the second picture after I had rubbed it into my skin a little bit, you can pretty clear see some little bumps of product.  I've found that lumpy texture to be pretty typical of this product.

Straight out of the brush tip
Blended out with 4-5 swipes back and forth.
Those little lumps are the concealer..not texture on my hand.
Coverage: You won't be able to use this for spots in my opinion unless they are very light.  It just isn't that kind of concealer.  I get the sense that this is meant for under eyes only.  That's fine.  Except that I don't find it does a lot for me for under eyes!  Check out the before and after:

Completely naked skin

No foundation, just the Lighten Up concealer under my eye and
blended out/down. Yes, I did blend the concealer over that freckle
if that gives you an idea of coverage
Did it add some lightness? Absolutely.  Did it cover some? Sure.  But you can still see that I've got some serious blue shadow going on.  For me, this level of coverage doesn't cut it.  Especially when I do not think that the application felt super smooth/even.  If your under eye circles don't have strong blue under tones, this concealer may be enough for you, you lucky girl.

Staying Power: I didn't set it with powder and it did stay at this level of meh-coverage all day, so that's something good.

Bottom Line
For me, this won't cut it.  If you are trying to just brighten up your under eye area and are not looking to counteract blue tones, you may enjoy this.  I think even at the drugstore price point I can find better.  I like Maybelline Instant Age Rewind Dark Circle Eraser (my shade is Medium), for instance.  At Target, you can grab Pixi's salmon toned concealer that is great on under eyes.  I think I can still make this product work by layering it with one of these two, but it won't work on its own for my uses.  Check out my other reviews for Flower stuff though, because like I said, I don't think the whole line is a bust!

Sunday, February 24, 2013

Quick Drugstore Haul and First Impressions: L'Oreal EverCurl Hydracharge Shampoo and Conditioner, Flower Beauty Concealer, and Nail Polish!

Hello lovelies! I made a quick trip to Target and Walmart this morning to pick up some groceries and of course that means that I picked up some hair and makeup stuff too.

I grabbed Flower Beauty Lighten Up Brightening Concealer, Sally Hansen Complete Salon Manicure in Mermaid's Tail, and L'oreal EverCurl Hydracharge Shampoo and Conditioner.

I will definitely be reviewing the hair stuff and concealer in depth, but I wanted to give you my quick first impressions of each product.

Flower Lighten Up Brightening Concealer
This stuff was pretty reasonably priced ($7.98).  The shade selection was a bit of a bummer though, as there were only four colors.  I debated between this one (BC2) and the next darkest shade for quite a bit, but settled on this one.  Luckily it matches pretty well with the concealer I've been using.

This concealer promises seamless coverage with a "lit from within effect."  I have really horrible, true blue under eye circles, so I always have low expectations for what a drugstore concealer will do for me.

When I got home, I wiped off the undereye concealer that I was wearing (Maybelline Instant Age Rewind).  This concealer twists up so that the product dispenses through a brush.  You've gotta twist it for a while for the first use as is usually the case with this packaging style, but it does dispense well once you get it primed.

This applied smoothly.  It's pretty pigmented and I did feel like it was comparable to my Maybelline concealer.  I've only used it once and haven't been wearing it for long, but it seems promising thus far.  

As I said, be on the lookout for a full review in the next week or so.

Sally Hansen Complete Salon Manicure: Mermaid's Tail
I picked this up because it is supposed to be a dupe for Deborah Lippmann's Across the Universe which I think is gorgeous.  It's been out for a little while as part of a seasonal collection but it has been promoted to a permanent spot in the line (it had it's own name slot at my Target).  

This isn't a color that I can wear on my finger nails right now because I'm in the midst of job interviewing, but I went ahead and did two coats on one nail so that you guys could see the color swatched.  I'm not planning on doing a separate review of this nail polish because I think most everyone is familiar with the Sally Hansen Complete Manicure line.  


This is a blue jelly filled with tiny blue glitter plus larger green and blue hexagon glitter.  

These pictures show 3 coats on a naked nail:
Naked nail: 1 coat
Naked nail: 2 coats
Naked nail: 3 coats (sorry about the messy edges! I wasn't being
careful since I knew I'd be taking this off right away)
These pictures show 2 coats over an electric blue (Sally Hansen Xtreme Wear in Blue It)

Over "Blue It": 1 coat
Over "Blue It": 2 coats
I love the way it looks over a blue nail polish.  I don't own a super dark navy, which I think would really make this something special, but I will definitely be purchasing one (hmm maybe Flower's April Showers...).  Like all glitters, it takes a bit of elbow grease to get it off, with I use 100% acetone as my remover, which makes it less of a chore.  I think this is a fun glitter that would work really well as an accent nail color or as a full manicure color

L'Oreal EverCurl Hydracharge Shampoo and Conditioner
This product is a spin off from the EverPure line of sulfate free hair products.  Both of these products are "100% sulfate free, no harsh salts, no parabens, natural botanicals, and 100% vegan." The shampoo contains silicones, however (amodimeticone, which generally does not build up, and a new cone to me, divinyldimethicone/dimethicone copolymer).  The conditioner contains mineral oil, so if you watch out for that ingredient, this conditioner is one to avoid (I personally don't have problems with mineral oil).

The shampoo bottle says that it is for wavy to tight curly hair, that it is non-drying, and that it uses an anti-frizz system of natural botanicals, including hibiscus and grape seed.  It promises to give you smooth, defined curls (every curly reading this just said "Yeah...ok...like I haven't heard that claim before!"  The conditioner also promises to give you smooth, defined curls.

The line also has a silicone-free cleansing conditioner, a leave in conditioner, and a cream gel.  I really wanted to try the cleansing conditioner, but it was sold out.  

My first impressions of this stuff are limited because I haven't actually used them yet.  But, I did pop open the caps to smell them and to take a look at the texture.

As far as the scent goes, let me just say I hate the smell of the other L'Oreal Ever-Whatever lines.  I think they smell very overpowering and fake.  This stuff, I was surprised to find, I like the smell of!  It's much more subtle/toned down from a quick bottle sniff, but obviously that opinion is subject to change after I get it on my hair!  Don't get me wrong, it's still pretty strongly scented.  It just isn't as bad as the other stuff from L'Oreal's hair care lines.

The shampoo is a semi-translucent pearly white and is pretty thick and creamy.  The conditioner is opaque, thick, and white.  They look promising!  I will be posting a full review once I've had enough washes to get a feel for what I think of them!  

Saturday, February 23, 2013

Worth the Splurge: Clarisonic Mia 2 Skin Cleanser Review

There are some products that are expensive but easily replaced by a comparable drug store product.  This is not one of those products!

I'm talking about the Clarisonic Mia 2.  For years, I held off from purchasing (first the original Clarisonic, then the Mia, and then the Mia 2...), reading great review after great review for this little device.  I tried the cheaper Olay version and wasn't impressed.  I sunk more money into products promising to do what the Mia promises to do: gently exfoliate, shrink pores, clear out acne, and leave your skin soft and bright.

Then I realized, what am I doing?! With all the money I've spent on this cleanser and that mask, I could've just bought the darn Mia by now!

So ladies, I'm here to tell you the Clarisonic Mia 2 is truly worth the splurge.

This image makes me want a fruity drink
First off, what's the difference between the Mia and the Mia 2?  The Mia 2 has features that were originally only available in the full size Clarisonic cleanser: more than one speed, a timer, and a travel case.  I could live without the timer and the travel case, to be honest, but I can't live without the two speeds.  More on that in a minute.  The Mia 2 also comes in some really cute colors.

I've had my Mia for about 5 months.  What differences have I noticed in my skin since I began using it? The very first time I used it, I was blown away.  My skin felt so clean and I could immediately see that a lot of dead skin had come off. I have very dry, sensitive skin.  Unlike a lot of exfoliators, this one didn't leave my skin feeling tight or irritated and red.  I have large pores, and I can see a difference in the size of my pores over time for sure.  I also notice that my already infrequent acne has basically disappeared.  I get maybe one blemish a month.

You won't be able to stop touching your face! After I used it for the first week, my fiance was lovingly stroking my cheek before bed one night, and he said that my skin felt softer than it ever has and asked me if I was doing something different.  Now, I love him, but my fiance is not the most observant person on the planet.  If he noticed, there was a big difference.

How do you use it? I use it in the shower in the morning and at my sink at night.  Yes, even with my incredibly sensitive dry skin, I can use this twice a day without issue.  It's something I look forward to doing.  In the morning, I use it with Cerave Hydrating Cleanser .  I find this cleanser really hydrates my skin and preps it for my makeup by smoothing out any dry or rough patches. This cleanser is designed for sensitive skin, so it's fragrance free.  At night, I use it with Philosophy Purity Made Simple.  This stuff takes off every bit of makeup in about 30 seconds without bing stripping or drying.  The scent is very gentle and doesn't irritate.  I find that now that I'v used it at night for so long, the scent calms me and gets me in a bedtime zone!

I use the slower speed in the morning.  Why? Well, I already took my makeup off the night before.  My goal with morning cleansing is to clean off any oil or dry patches from the night of sleeping and to increase circulation to my skin.  I want a clean, smooth surface for makeup.  An unexpected result? I use less makeup.  I don't need to use very much liquid foundation at all now.  My concealer is just used for my undereyes, because I have really bad genetic dark blue undereye circles.  I find that I can get a nice smooth surface without piling on layers of makeup.

I use the faster speed at night when I really want to take my makeup off and cleanse away the day.  I find I only need about 30 seconds for the makeup to be gone, and I use it for another 30 seconds or so just because it feels good.  I then put on my moisturizer, and it's off to bed!

Brush heads.  I use the sensitive/delicate skin brush heads.  I find that they really cleanse well without being rough or irritating.  Amazon has the best price of any place I've seen because you get two in a pack.  I replace the brush head every three months.

I really can't recommend this product enough.  It's changed my skin for the better, and I don't intend to be without it ever again.  You invest hundreds of dollars into clothes and shoes, but you wear your skin every day.  That's what changed my thinking on the splurge of this product.  I have to show my skin to the public every day.  It's worth the investment.

Check it out: Clarisonic Mia 2, Philosophy Purity Made Simple Cleanser, Cerave Hydrating Cleanser, and Replacement Brush Heads

Friday, February 22, 2013

Top 5 Makeup Books to Put on Your Spring and Summer Reading Lists


As I mentioned in my post on the Top 5 Curly Hair Care and Styling books, I love reading!  Makeup books are no exception.  I used makeup books to teach myself how to apply makeup like the pros.  Now that I've got my favorite techniques down, I use makeup books for inspiration. When I find that I've been using the same eyeshadow colors or the same blush for a while, I flip open a book to find something that I can replicate or draw inspiration from.

Here are my Top 5 Makeup Books that I would recommend to my friends!

1) Making Faces by Kevyn Aucoin


Aucoin started his makeup career off with Revlon. He's launched several makeup lines around his philosophy that there should be makeup for every imaginable skintone that helps bring out natural beauty, rather than limited ranges that seek to cover and hide.  He's worked on celebrities from Julia Roberts to Cher. This book was a TIME bestseller.

This is the book to get if you're looking to learn how to apply makeup like the pros.  The photos are gorgeous and use non-celebrities to achieve a variety of different looks.  The book is from the 90s, but a lot of the looks are classics.  This is my favorite book to recommend to someone who asks me for advice on how to apply makeup.  It's a classic.

2) Jemma Kidd Makeup Master Class by Jemma Kidd


Jemma Kidd is a countess, former model, and makeup pro.  She runs her own cosmetics business and runs a makeup artist school in London.

This book will be a classic in 10 years! I think of this as the essential update to Kevyn Aucoin's book.  Published in 2009, this book has gorgeous photos and easy to follow advice for applying makeup.  This book excels at providing photos to backup what the author is saying.  Techniques are always photographed rather than just explained in text.  She recommends her own products throughout the book, which is a bit of a downside, but since everything is photographed, you can find your own versions of things easily.

3) Bobbi Brown Makeup Manual

Bobbi Brown is the beauty editor for the Today show and a self-made business woman.  She has her own makeup line and has written five books on the subject.

I have two of her books and this one is my favorite (the other one I have is Bobbi Brown Beauty).  This is a makeup encyclopedia.  I think this book lives up to its description of being for everyone between beginner and pro skill levels.  The photos and instructions are crystal clear.  This book overflows with tips and tricks that are easy to incorporate into what you're already doing (for example, applying concealer under your foundation for certain types of problem areas).  This is a must-have for makeup lovers.

4) Face to Face by Scott Barnes


Scott Barnes is a professional makeup artist.  His list of celebrity clientele is longer than a red carpet line at the Oscars.

This is the most unique book on the list.  The others are about technique whereas this book focuses more on creating distinct looks.  There are looks from a corporate appropriate look to a dinner date to a red carpet.  Keep in mind that this isn't going to give you the same level of step-by-step how to's, but in conjunction with the knowledge one of the other books can give you, this book can serve as meaningful inspiration and guidance when you're deciding what makeup to wear for a certain occasion. This would make an amazing housewarming gift for a young woman moving into her first apartment! This would look very chic on a coffee table or on a vanity as it's hardcover.

5) Makeup: The Ultimate Guide by Rae Morris


Rae Morris is a former model who has written three books on makeup thus far.  She works as a makeup director for L'oreal and is a four time winner of Australia's Best Makeup Artist.

This book is for those with the basic set of skills already mastered. This would make an amazing coffee table book for a young woman's apartment! The photos are editorial and very high fashion glamorous.  They are a great source of inspiration when you are stuck in a makeup rut.

Monday, February 18, 2013

Top 5 Curly Hair Care and Styling Books to Put on Your Spring and Summer Reading Lists


I love reading! And I don't just mean that I pick up a book from time to time. I mean that my Kindle is overflowing, and I keep a running list of things I want to read.  Admittedly, my pace of getting through books has slowed since I've been in grad school, as those books take up a lot of time.

But when those books aren't taking up my time, I read everything from A Song of Ice and Fire (the books that the HBO series Game of Thrones is based on) to books on hair and beauty.

When I first started browsing for hair books, I was shocked at the selection.  As of this blog post, Amazon.com has 28,000 results for "hair books." Crazy huh?

I've read dozens of them.  I wasn't kidding, I love my reading material.  Without further ado, I present my Top 5 books on hair care and styling that I would recommend to any of my best friends without hesitation.

1) Curly Girl: The Handbook


This is the curly girl book that in large part began the no sulfate/silicone craze that has changed so many curly lives.  In this book, Lorraine Massey, a curly hair stylist, explains why you should stop treating your sweaters better than your treat your hair.  She explains that most shampoos contain a harsh ingredient called sodium lauryl sulfate, the same stuff you find in your dish detergent.  She asks you, why are you using gentle detergents on your favorite cardigan, but using the harshest stripping agent on your own scalp and hair?

This book has everything from general advice on caring for curly hair, a breakdown of the different types of curly hair, and even tips on how to trim your own hair!  It's the best starting point for curlies who are trying to love their curls for the first time.

2) Better than Good Hair: The Curly Girl Guide to Health Gorgeous Natural Hair


This book was written by Nikki Walton, a natural hair blogger.  While some of the book is written with African American hair in mind (specifically, transitioning from relaxed to natural hair), the advice works for women of all hair types.

This book reads sort of like a supportive hug from someone who knows what it's like to hate your hair. This book has advice for caring for children's hair, especially when you aren't a curly yourself but your child is. This book is also funny. It will make you feel like you're sitting around sipping coffee with a friend who understands what you're feeling about your hair.  A great coffeshop read for sure!

3) Coils and Curls: The Hair Product Handbook


Are you confused about what ingredients you should look for and stay away from in your products? Do you feel like every time you pick up a new product it's a complete guessing game about whether it will work for you?

This is your must read book. The author is a member of the Society of Cosmetic Chemists, so she knows her stuff.  This is chemistry and science brought to you in an easy to understand and well-organized form. For $5 on Kindle, you can read about everything from what kinds of cleansing you need to do if you are a curly swimmer to what ingredients make products effective at different price points.

4) Hair Care Rehab: The Ultimate Hair Repair and Conditioning Manual

This is like a hair encyclopedia.  The author also wrote another fantastic book called The Science of Black Hair, but since this book applies to a wider audience, I'm recommending it in this list.

This book discusses the basics of hair care and hair science, offers a "detox" program to get your hair into healthier shape, and presents tips for dealing with many common hair and scalp problems, from eczema (that's me!) to dandruff to frizz to grease to heat damage and on and on and on!  The advice is sound and the information applies to such a wide range of problems with hair and scalps. I read it from cover to cover even though some things don't apply to me (I've never had a chemical burn, for instance, but I still read that chapter). The information is easy to understand whether you're a beginner or a seasoned hair care pro. It's also full of gorgeous black and white photos that make it's presentation just as good as the information.

5) Strictly Curls: A Step by Step Guide to Styling Curly Hair


This book is all about curly hair styling.  Most of the styles are up-do's geared specifically toward curly hair.  Each style has a rated difficulty level, so even people like me who aren't good at styling hair can find something to try. Trust me, if I can do it, you can do it.  The instructions are easy to follow and the pictures are very helpful.

Sunday, February 17, 2013

Review: REM Facial Hair Removal Spring

You know how sometimes, you settle in for a little online shopping, and you see something that completely surprises you?

Well that happened to me a few weeks ago.  I was on Amazon and I was looking for various things in the beauty department, just clicking around really. Eventually, I clicked my way over to the facial hair removal stuff.  Let me just get this out there. I have PCOS, so I know a thing or two or ten about excess hair growth.  I've had upper lip hair since I was very young, and if I wasn't diligent with my tweezers, I'd probably have a unibrow.

But the thing is that while I'm really good about maintaining my eyebrows, I'm really bad about upper lip hair.  I think it's just because I'm a sissy. It hurts to do anything with upper lip hair! You can pluck, but the hairs are so fine and it hurts like crazy. You can wax, but that hurts and is super irritating to sensitive skin. You can bleach, but then you just have a blonde mustache!  You can use creams, but those burn even more than waxing!

So really, I've pretty much just given up on removing that hair.  But on Amazon a few weeks ago, I noticed that the number one item in facial hair removers isn't a pair of tweezers, a cream, a wax kit, or a bleaching agent.

It's this.


It's called the R.E.M. Spring Facial Hair Remover.  I couldn't help but notice that it has a 4.3/5 star average for 522 reviews as of this blog post!  I thought, hey, that many people can't be wrong! And guess what, they weren't!

To use this clever little tool, you bend it into an upside down U shape, place it on your skin, and roll it toward your skin.  If you don't get what I mean, once you play around with it for a minute, you will.  You will know that it is grabbing the hair.  The first time you use this, I won't lie, it hurts like crazy.  I had to take frequent breaks.  If you have a numbing agent of some kind, like an insect bite treatment or something like that, I'd seriously use it at least the first time.

This thing is the most effective thing I've ever heard of or tried for hair on the upper lip, fine hairs on the chin, and peach fuzz on cheeks.  It doesn't leave a shadow like plucking or waxing can.  I find that it grabs the hairs and pulls them all the way out from the root, so the area will stay hair free for as long as a waxed area.

So now that I sound like a spokesperson (I'm not), any downsides? Other than the pain the first use (the pain does go down, by the way. I think it's because you are grabbing so much hair the first use, and the next uses don't have as much to grab), the other downside is cleaning the tool.  As you can see, the coils are really tight.  This makes it tricky to actually remove the hair from the hair remover! Hair remover inception!

But I've got a trick for that!  Take a roll of masking tape or packing tape, wrap some tape around the coils, then peel off the tape.  The hair that was stuck in the coils is now on the tape.  Ta da!

I think the other great thing about this tool is that it's $15 for something that you use over and over and over.  Waxing kits and creams and bleaching agents need to be purchased again and again.  I like that I'm saving money with this thing because I've only got to buy this one!

Have you got any cool beauty gadgets or finds that surprised you that you can't live without?  Leave me a comment!

Try out the R.E.M Spring for yourself and let me know what you think!

Friday, February 15, 2013

Review: Flower Cosmetics Nail Polishes

Next up for review: Flower Beauty nail polish!
Left to Right: Fanatical Blossom, Gorgeous Gerbera
These nail polishes promise "super short dry time, smooth application, [and] premium glossy shine" in two coats.  Sounds good!  I picked up two colors: Gorgeous Gerbera and Fanatical Botanical.  Gorgeous Gerbera is a peachy pink that is very trendy for spring, and Fanatical Botanical is a metallic rose gold.

What I look for: 1) opacity in two coats, 2) shiny finish, 3) good staying power.

Color Selection: I want more! There are 16 shades in the collection right now. There were several reds and lots of light colors, but only 2 dark colors.  This collection right now screams trendy for spring but wearable for everyone.  There were only a couple of colors that I thought would be inappropriate for a professional woman to wear to work (either because they were super bright or super dark).  I was on the edge of grabbing one dark shade called April Showers which was a very dark blue, but I thought it would probably come across as black from far away because of how dark it was.  I was also tempted to grab the mint green, but I already a mint green at home and couldn't justify it.  I definitely want to pick up one of the reds but I couldn't decide on this first trip, plus I didn't know if I'd like them enough to buy more.

Price: These are a great deal at $4.98 a piece.

Formula: A quick note here for someone who took many hours of college chemistry.  The company totes these nail polishes as having a "3 free" formula, and explains that this means that they are free of DBP, toluene, and camphor.  I'm not looking to start a debate, but here are my thoughts on this. Dibutyl phthalate (DBP) has, according to Wikipedia, been phased out by all major U.S. nail polish producers since 2006.  So that's not a very special claim, but I suppose it's a good thing. Toluene is sort of like the weak younger brother of benzene, a carcinogen.  Toluene itself has very little carcinogen potential, and only causes significant effects when inhaled in large quantity. Most major nail polishes are also toluene free.  Again, I suppose it's a good thing not to have it, but still not a unique thing.  Finally, camphor. This claim confuses me. We use camphor as a flavoring in food! It's very aromatic.  It's also soothing for inflammation and is in many anti-itch medicines.  Camphor is only toxic in large doses.  So again, I suppose good for them for not including it, but I wouldn't run away from the ingredient in everything.

Application: These applied pretty well.  I found that I needed to put on a thicker first coat with Gorgeous Gerbera than what I would ordinarily use because of some streakiness. But what's weird is that Fanatical Botanical was not streaky at all and I was able to do thin coats! So maybe I got a bad bottle of Gorgeous Gerbera or maybe it just varies from color to color. The consistency is very smooth and the brush size is perfect in my opinion. The second coat went one much nicer than the first with Gorgeous Gerbera, and as you can see below, I was able to get a nice finish.  In the future, I will likely use a base with Gorgeous Gerbera to see if that helps the first coat go on a bit more evenly. I don't think I would do that with Fanatical Botanical, as I was quite happy with that application.

The brush is shaped like a traditional nail polish brush as opposed to the wider brushes that some companies are doing now (like Sally Hansen Complete)  The cap to the polish is quite large, which I don't mind but it could hinder application for some.  The coats dry quickly and are touchable within about 3-5 minutes, even with the thicker coats I was using with Gorgeous Gerbera.

Gorgeous Gerbera: First Coat
Gorgeous Gerbera: Second Coat
Fanatical Botanical First Coat
Fanatical Botanical Second Coat


Final Results: I think that the colors on my nails, for once, looks better than in the bottle.  The colors on the nails really pop! I can't stop looking at them, but in a good way.  Very pretty shades.  You may be able to see some brush strokes when it's all said and done though. Gorgeous Gerbera was truly opaque.  Fanatical Botanical is a little bit more sheer (you can see if you have dirt under your nail).  They dry very shiny on their own.  I did not feel a need to use a top coat.

Gorgeous Gebera (Note to self..Clean up edges before pictures!)

Staying Power:
A picture is worth 1000 words, so here's the time lapse! In the interests of getting this post published sooner rather than later, I am only showing the staying power pictures for Gorgeous Gerbera.  I have thus far not had any early peeling or chipping with Fanatical Blossom.
At the end of Day 1
Late in Day 2
End of Day 3
End of Day 4. One little chip.
I took the polish off after this photo to put on Fanatical Botanical
Bottom Line:  
I think these are good for the price.  The application may vary by color, but the shades are gorgeous and very on trend yet wearable.  I will purchase more of these.  I'm anxious to try one of the red shades.